Before…and AFTER!!

Wow! It has been months without an update posted on here about our progress…and yet it seems as if the entire holiday season passed in the blink of an eye! We worked at full speed for several months in order to get the house ready for the Holiday Home tour. The two day tour was a complete success bringing in over 1300 guests and lots of exposure for our great neighborhood as well as The Reclamation Project, a community initiative to create a center for refugee immigrants which occupies the space at the former Rialto Theater on Calhoun Street. The two days of the tour were absolutely exhausting but hearing so many people say nice things about the work that we have done made it totally worth it. We opened up the foyer, the living room, the dining room, the master bedroom, the bathroom, and Raul’s office for the tour.  I thought it would be fun to show all of you just how far we have come since purchasing this home last March (wow, 1 year already!).  I’ve been seriously procrastinating as it is now almost Spring and I am just now getting around to editing and posting pictures of our house decorated for Christmas but better late than never! I was so fortunate to have the help of my mother and gram who helped me decorate for the tour. Also, my grandmother even asked some of her friends to donate some Christmas decorations which just looked absolutely beautiful in our home. I am so thankful! With everyone’s help I was able to do so much more than I could have managed on my own.

So without further ado please take a look at the colorful before and the marvelous after! (click on each picture to see it bigger)

Foyer BEFORE:

Entryway before

Foyer AFTER:

Entryway afterentryway after 2entryway after 3

Living Room BEFORE:


living room before

Living Room AFTER:

living room after living room after 2

Dining Room BEFORE:

Dining Room before

Dining Room AFTER:

dining room after dining room after 2

Master Bedroom BEFORE:

master bedroom before

Master Bedroom AFTER:

master bedroom after master bedroom after 2 master bedroom after 3

master bedroom after 4

Bathroom BEFORE:

bathroom before

Bathroom AFTER:

bathroom after bathroom after 2 bathroom after 3


Bathroom update!

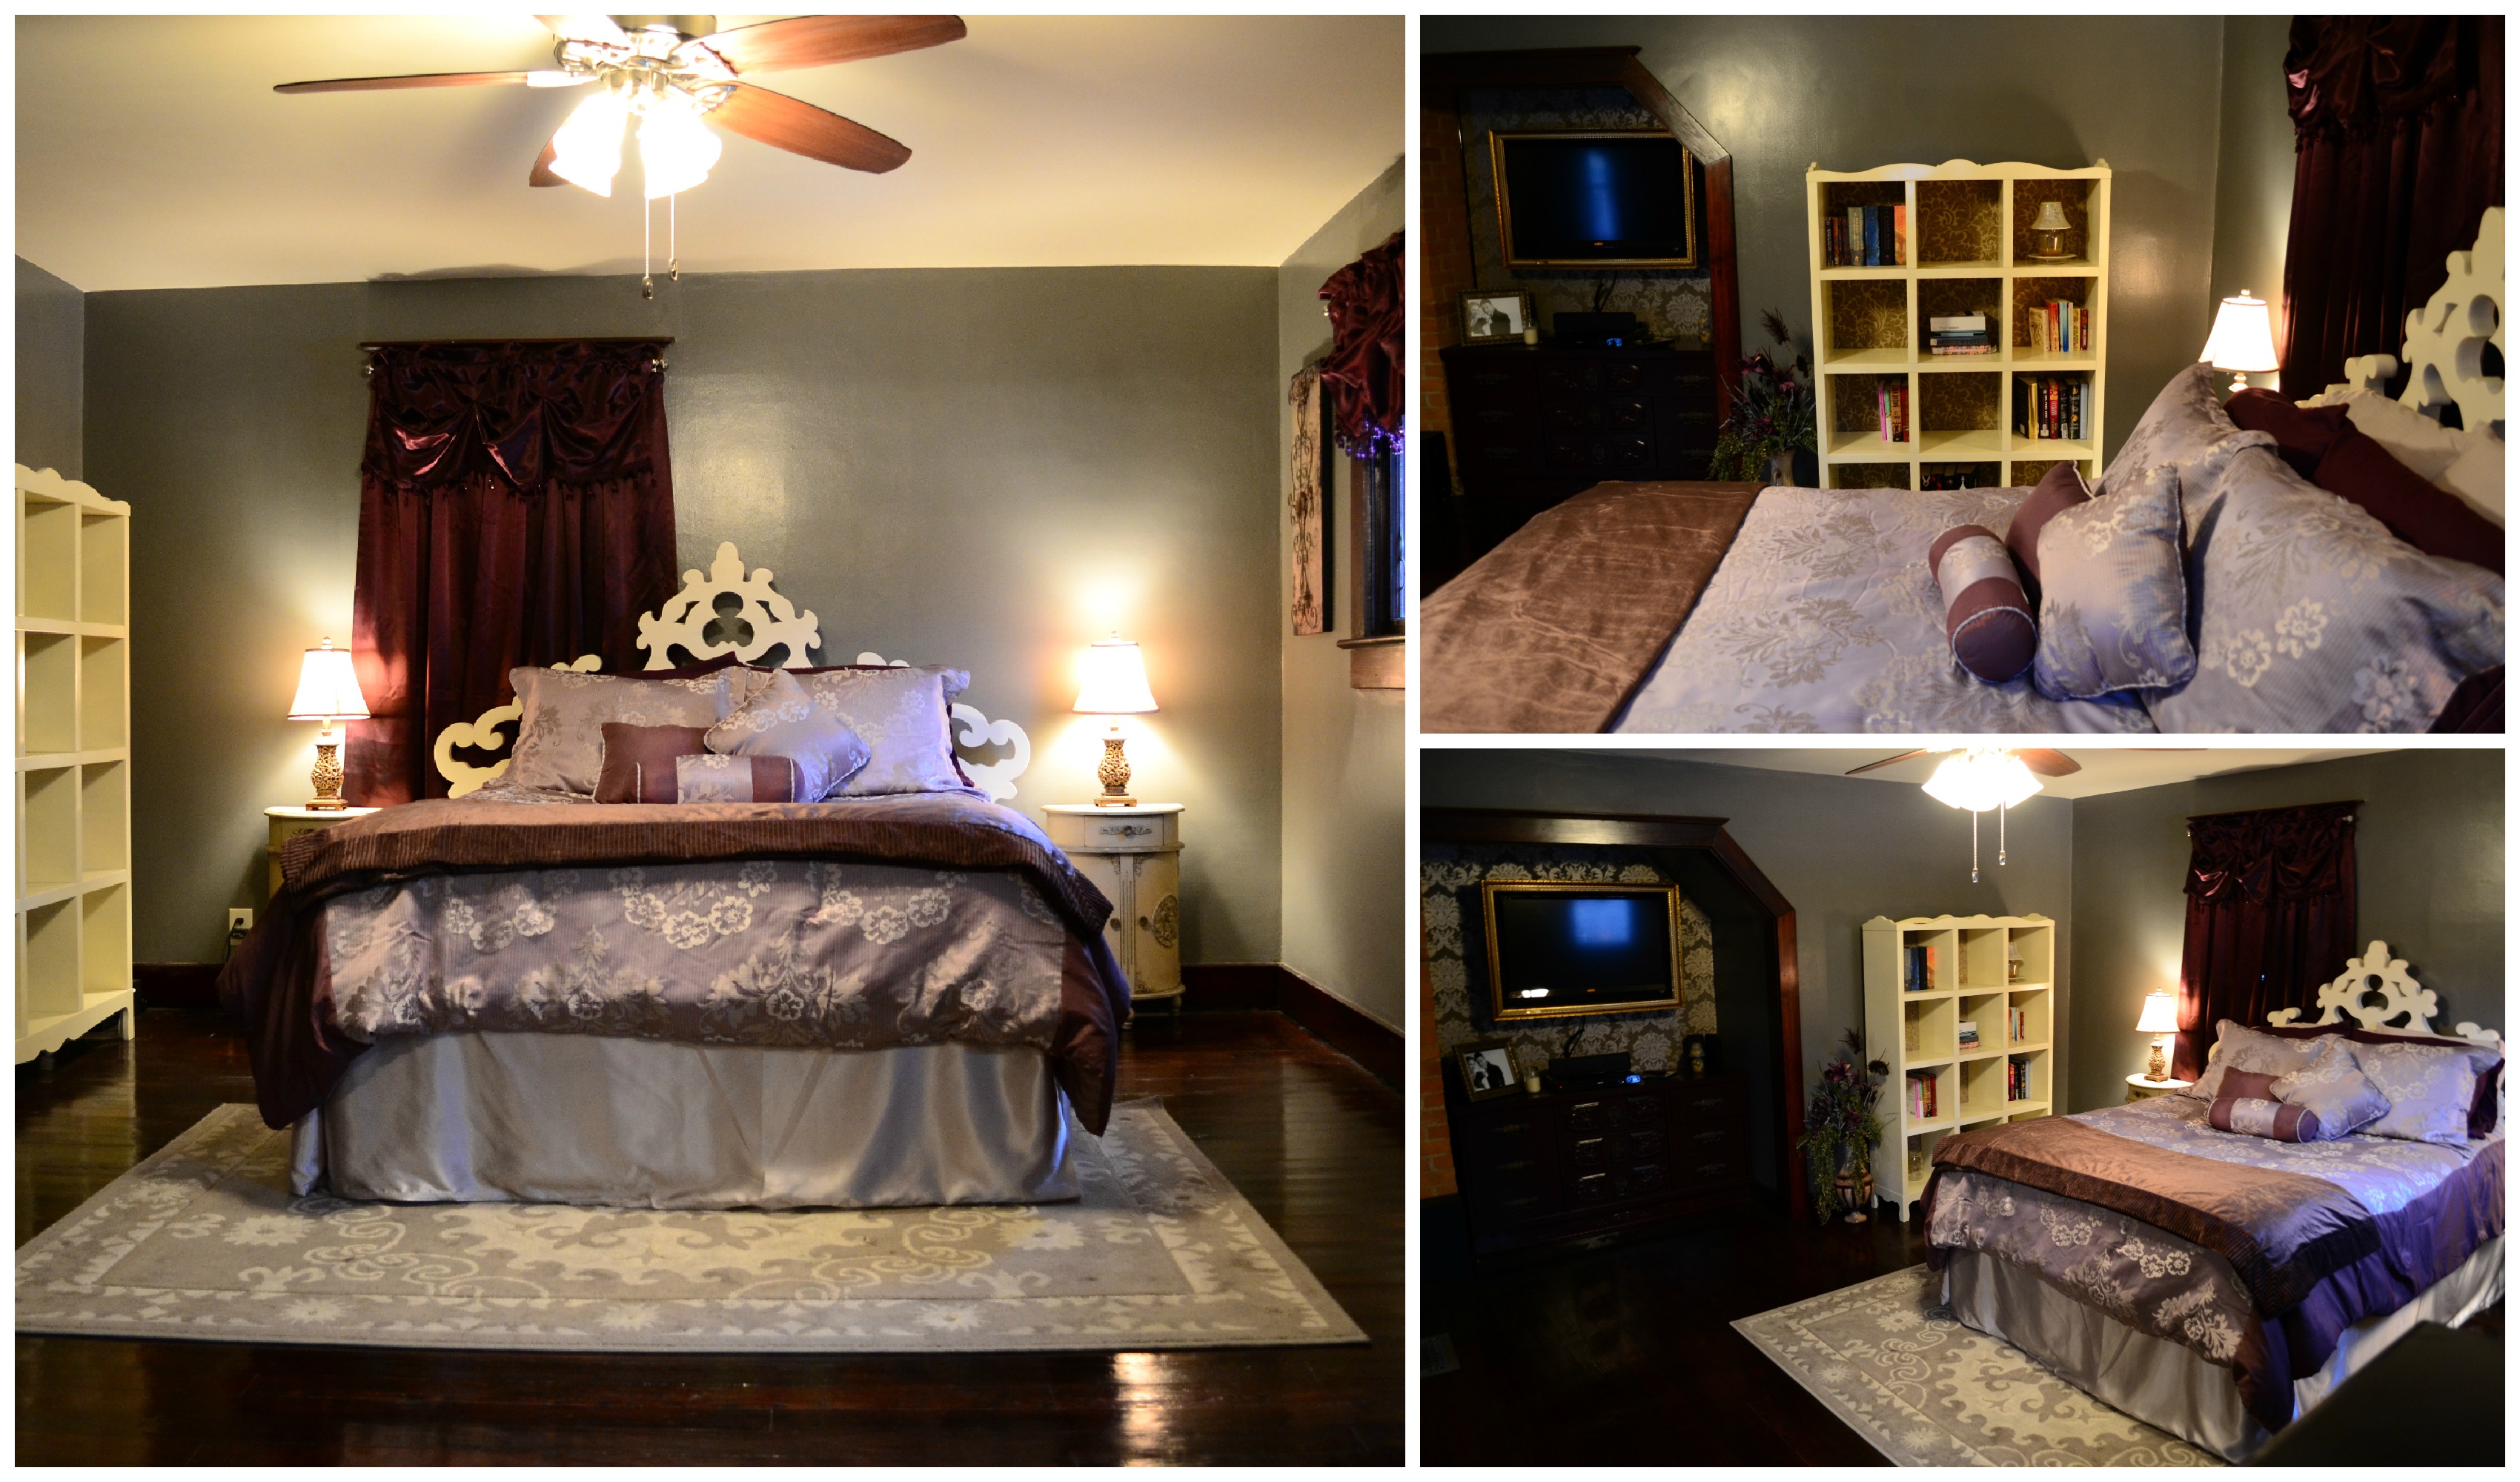
I will never ever ever EVER wait this long between blog posts again! Oh my! Just trying to organize the photos over the last couple of weeks has been an absolute nightmare! Then, to top things off, I accidentally deleted half of the pics I wanted to show you guys before I even got them up on the blog 😦 major bummer!

But, never fear, I will press forward!…and you will have to rely on my imaginative descriptions as opposed to the colorful pictures for the next couple of posts!

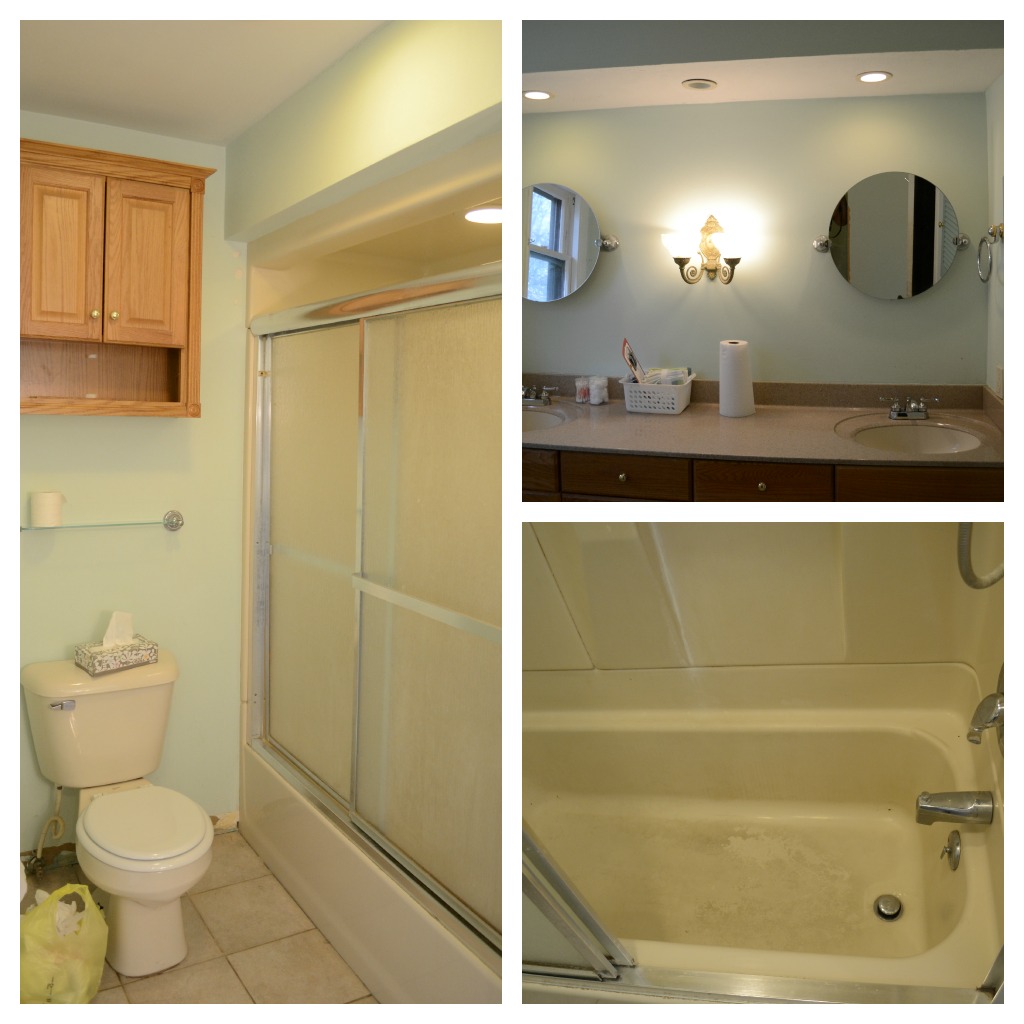
If you will recall, the last time I wrote about the bathroom in our house we had just hung cement board in the shower and were ready to install new plumbing and tile on the shower walls.

Before we could proceed we had to install the new bathroom fan. The job required a little work from the outside, too 😉

I’m glad that job fell to my dad! That’s too far up there for me!

After the fan was installed (a $30 clearance item at Menard’s by the way!!), we were ready to start mixing the thin set for the tiles.

When you consider the powdery substance that must be mixed with water by a giant attachment to the drill that looks curiously like a hand mixer…well, making up a batch of thinset ain’t a whole lot different than baking a cake! And if there’s one thing I love to do, it’s bake a cake 😉

The consistency of this stuff is a bit different though. Oh! And I learned a few tiling jobs back to always wear gloves (latex, in my case) before attempting this project. If you don’t your hands and nails will be ruined for at least a couple of days! Also, remember to mix the thinset in small quantities- especially if you are not that talented at laying tiles. This stuff tends to dry out pretty quickly.

We were lucky in that my dad was mixing thinset as well as cutting tiles while my friend Phil and I laid the actual tiles on the wall of the shower.

With three people helping the job went fairly fast although we did run into some problems when we were adding a strip of mosaic tile and also when we inserted the ceramic soap dish and corner shelf. The shelves were pretty heavy to be supported by the thinset and so we had to rig some temporary support systems. We also ran into a problem where the large 12×12 tiles were sliding into the mosaic tiles (stupid gravity!) and pushing everything out of place. We finally solved the problem by creating spacers out of paint stirrers (who woulda thunk?!) and waiting until the mosaic tiles had completely dried in place before adding any 12×12 tiles above them.

The next step was to waiting for everything to dry properly. Then, the blue spacers could be removed and grout could be applied to fill the cracks between the tiles.

Grouting is a super easy process that works best with two people. When my dad and I are working together, he smears the grout into place and I follow behind with many, many clean rags to wipe off all of the excess. It is a dirty process but it certainly pulls the look of the tile together.

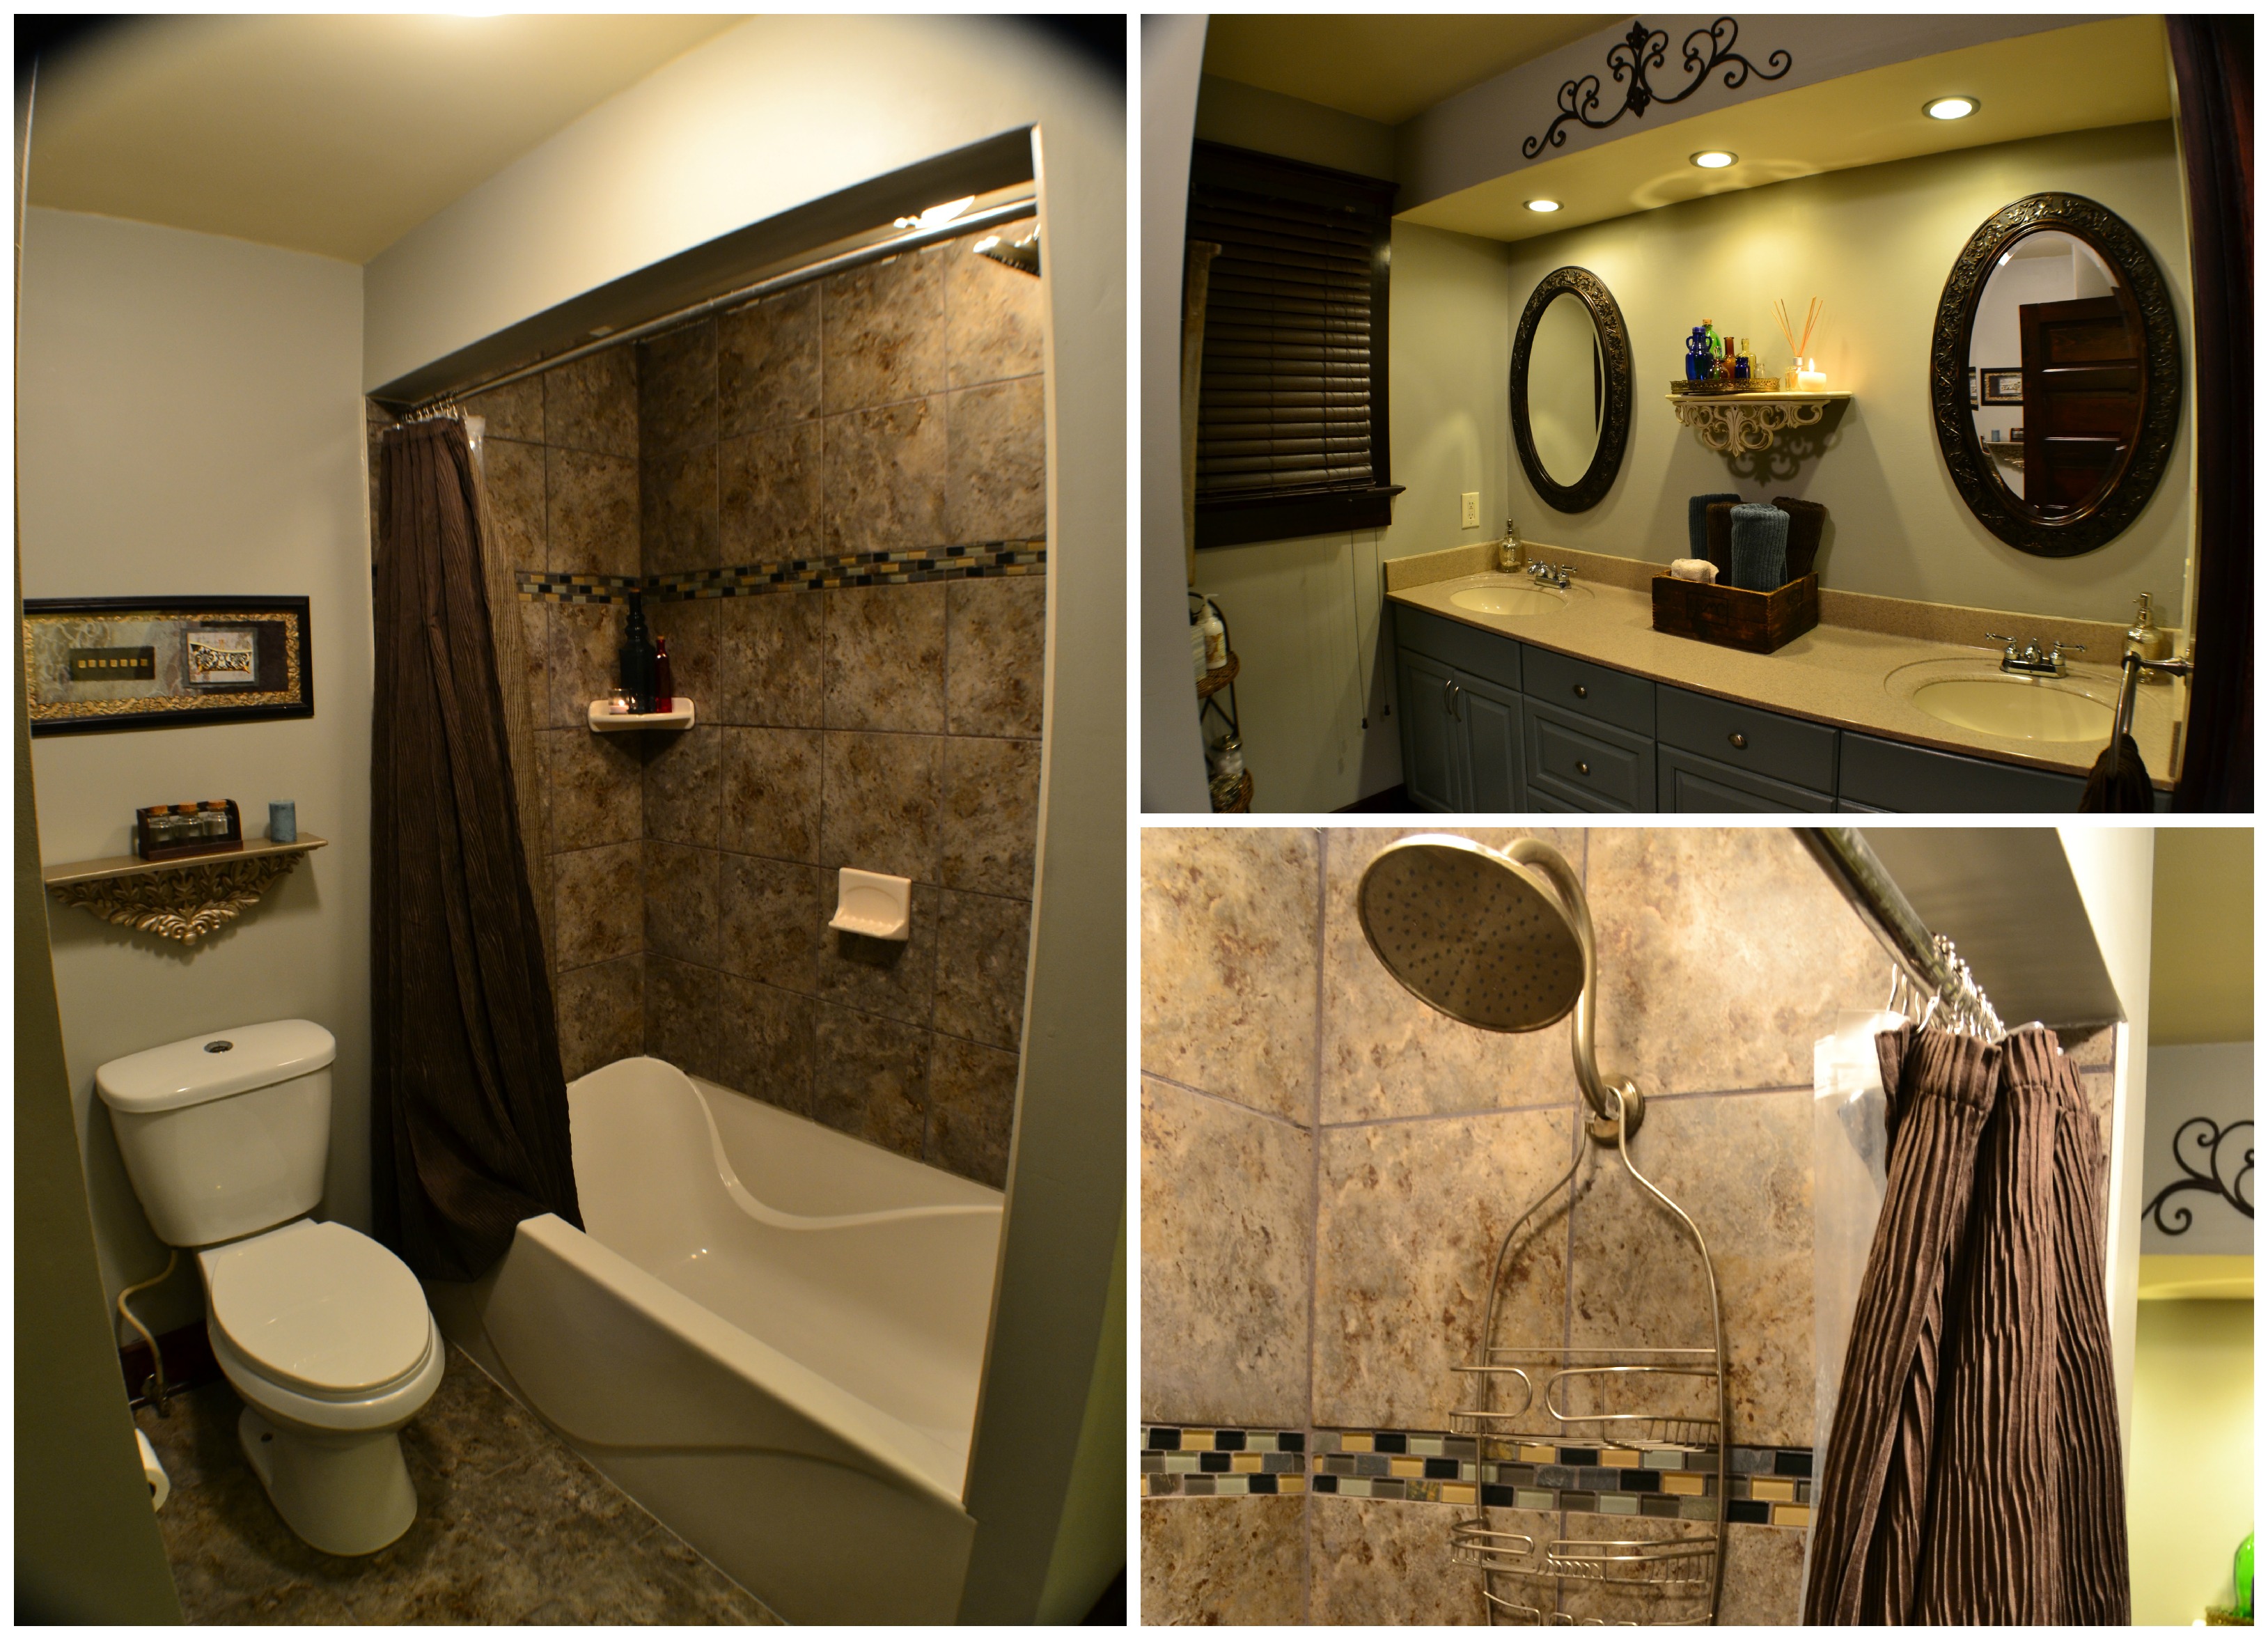
Check out a couple close ups of the finished product!

Meanwhile, we were also working on revamping the vanity. Raul and I decided to keep the granite-ish countertop but the factory finish oak cabinets had to go! Instead of purchasing new cabinets I did a lot of research about how to paint cabinets. All the forums raved about Advance paint from Benjamin Moore which is a latex paint which basically acts like an oil based paint without all the negatives. I scooped a can of the stuff and started on my project. The first step was detaching all the doors and drawer faces. I removed all of the hardware and then filled in all the holes with woodfiller. A couple of sandings later and voila!- I was ready to prime.

We opted to spray the cabinet faces rather than brush or roll them in order to get a smoother finish and avoid any marks.

We sprayed on one coat of Killz primer and let them dry for a couple of days due to the high humidity in the basement. Then, it was time to try the magic Benjamin Moore paint. I picked a color somewhere in between blue, green, and gray that went really well with the countertop as well as the tiles on the shower walls and floor.

We ended up spraying the cabinets twice in order to get a nice even coverage. When everything was good and dry we updated the look with some new brushed nickel hardware. Everything I read recommended that we let the cabinet faces sit for a week or two before installing them back on the vanity in order to avoid and nicks.

Once we got everything back in place the vanity looked completely different!

After a ridiculously long and tedious process of mudding, sanding, and repeating, we were able to not only finish out the tile on the floor using the same process, but also apply a couple of coats of light greyish tan paint to the walls- “Colonial Gray” to be exact, a historical color from Valspar 😉

It was also time to add a new shower faucet. I got a really cool set online for a great price. It’s design was also made to look vintage-y which was something I wanted to maintain as much as possible in this brand new bathroom.

We decided to go ahead and replace the toilet in the bathroom as well (Why the hell not?!) and I got a great deal on one of those water saving toilets. You know one of those with one button for liquids and one for solids? 🙂

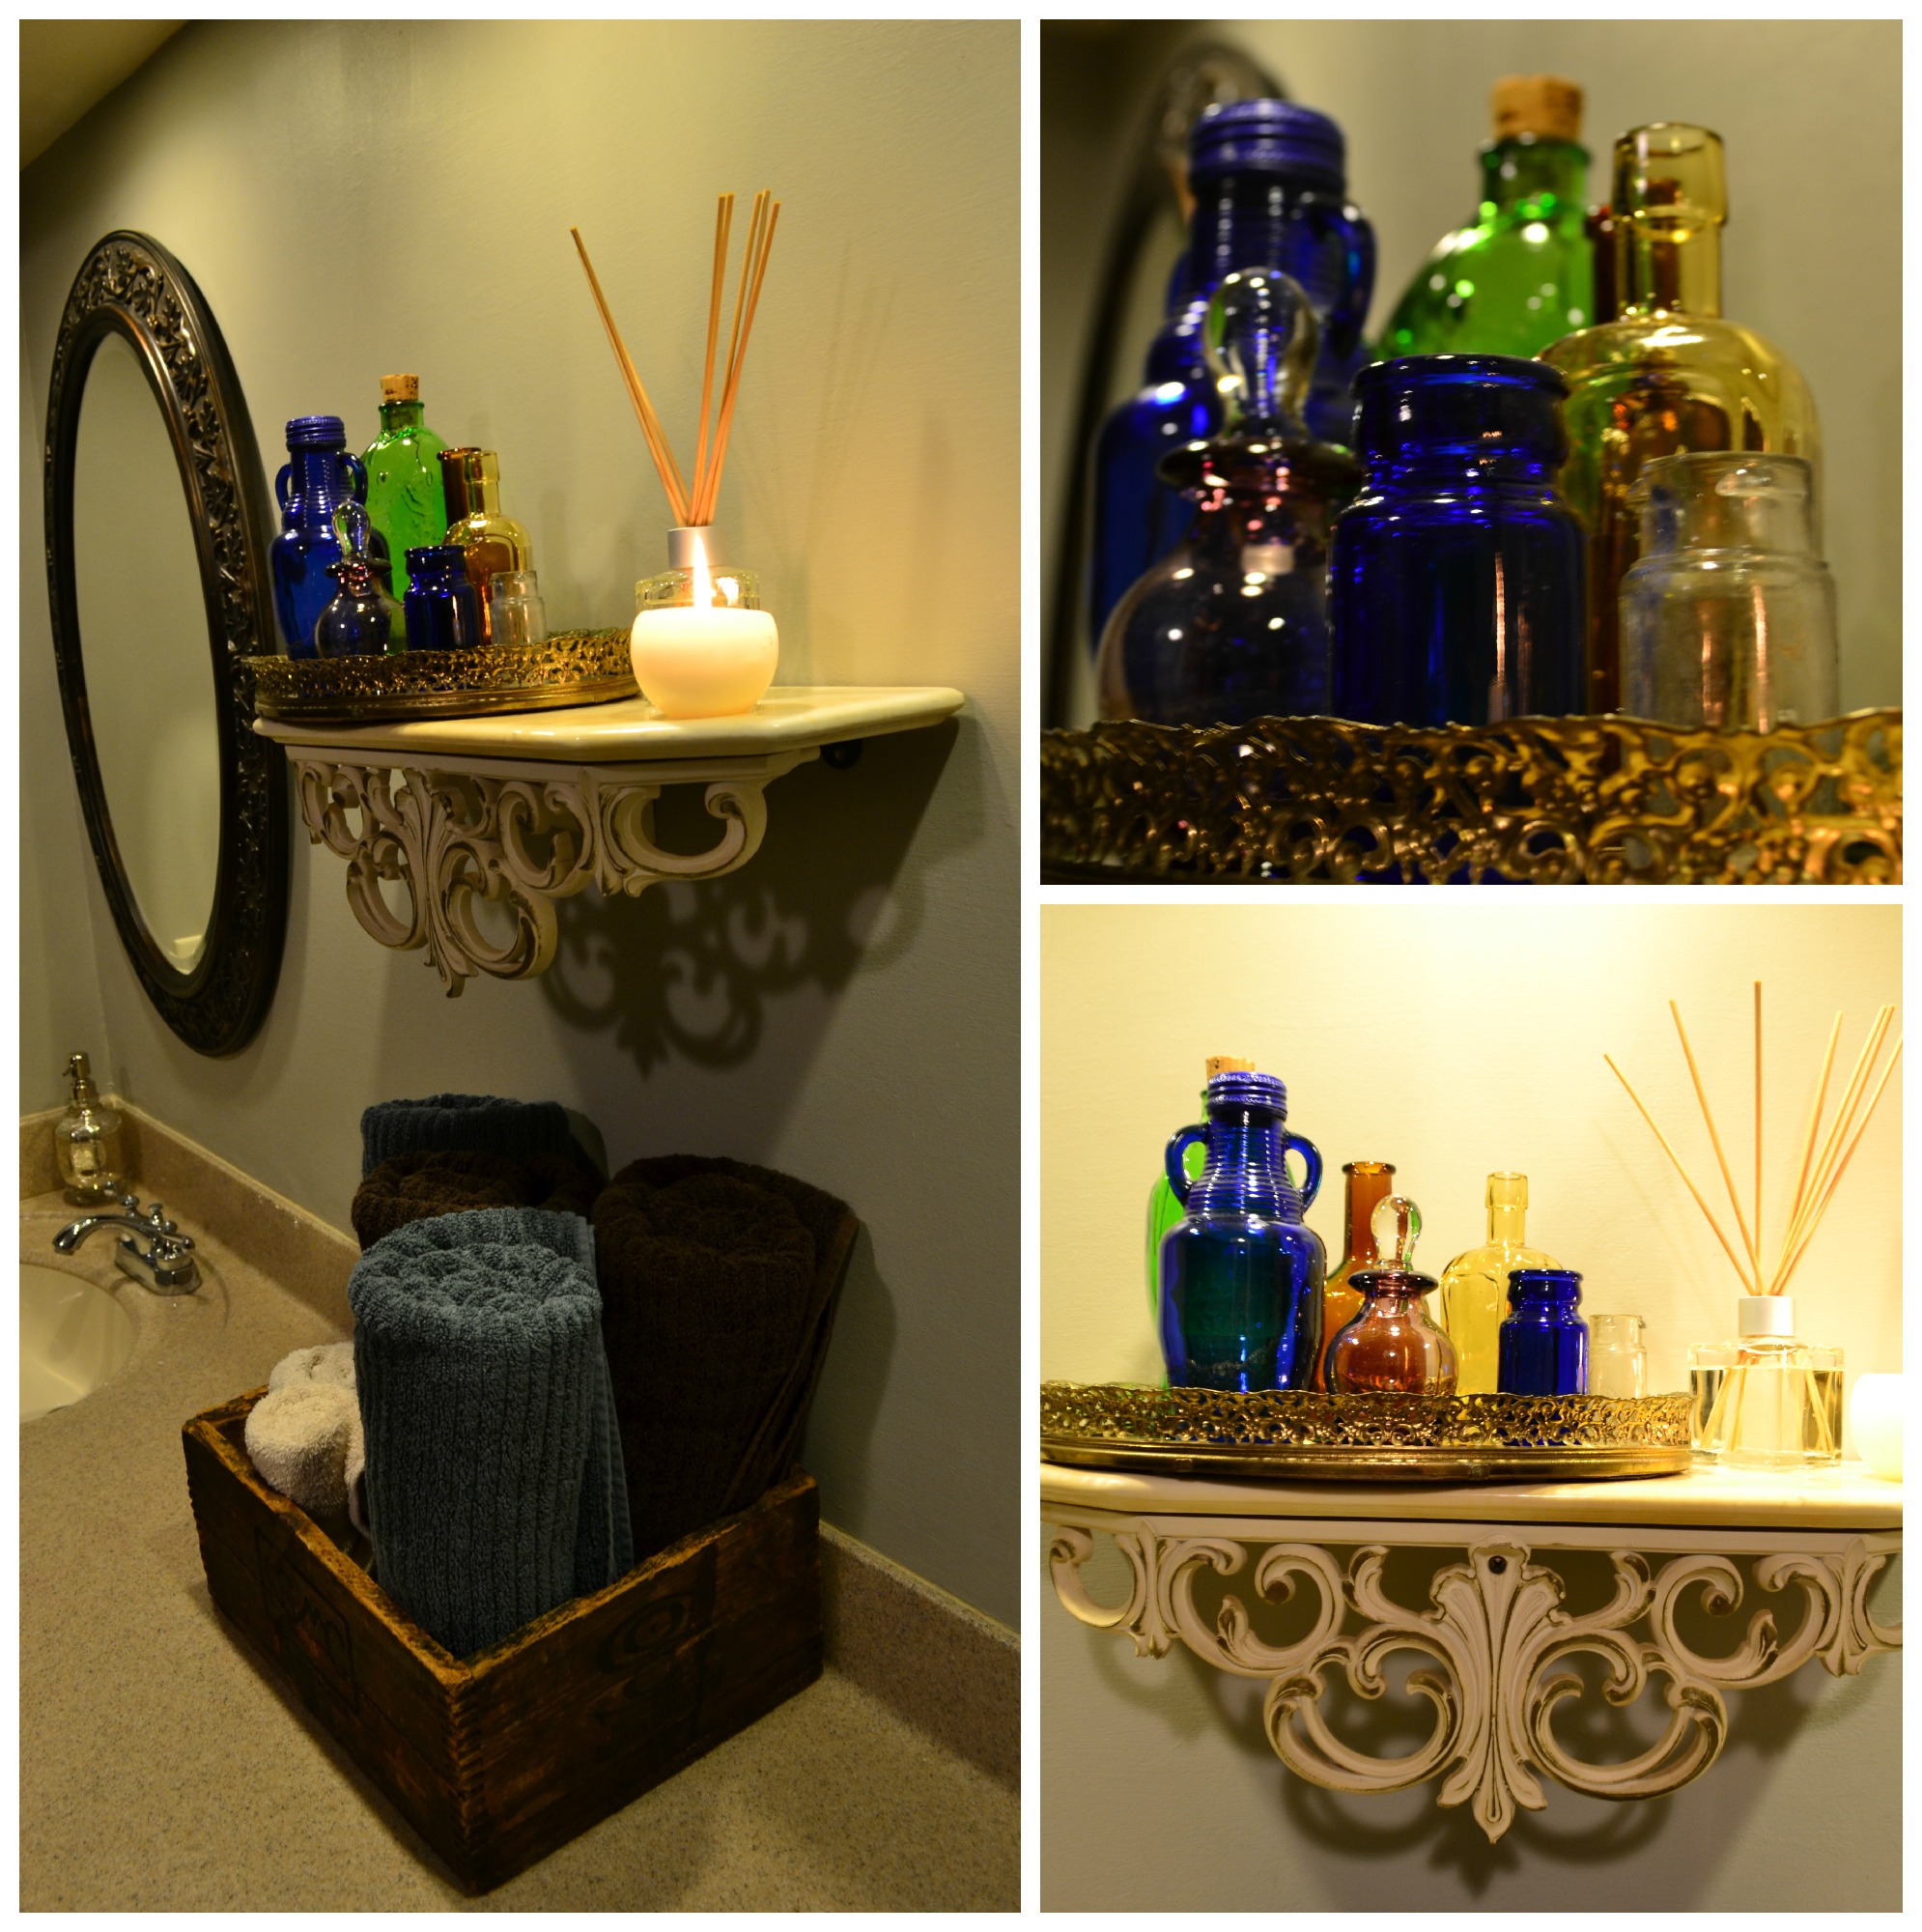
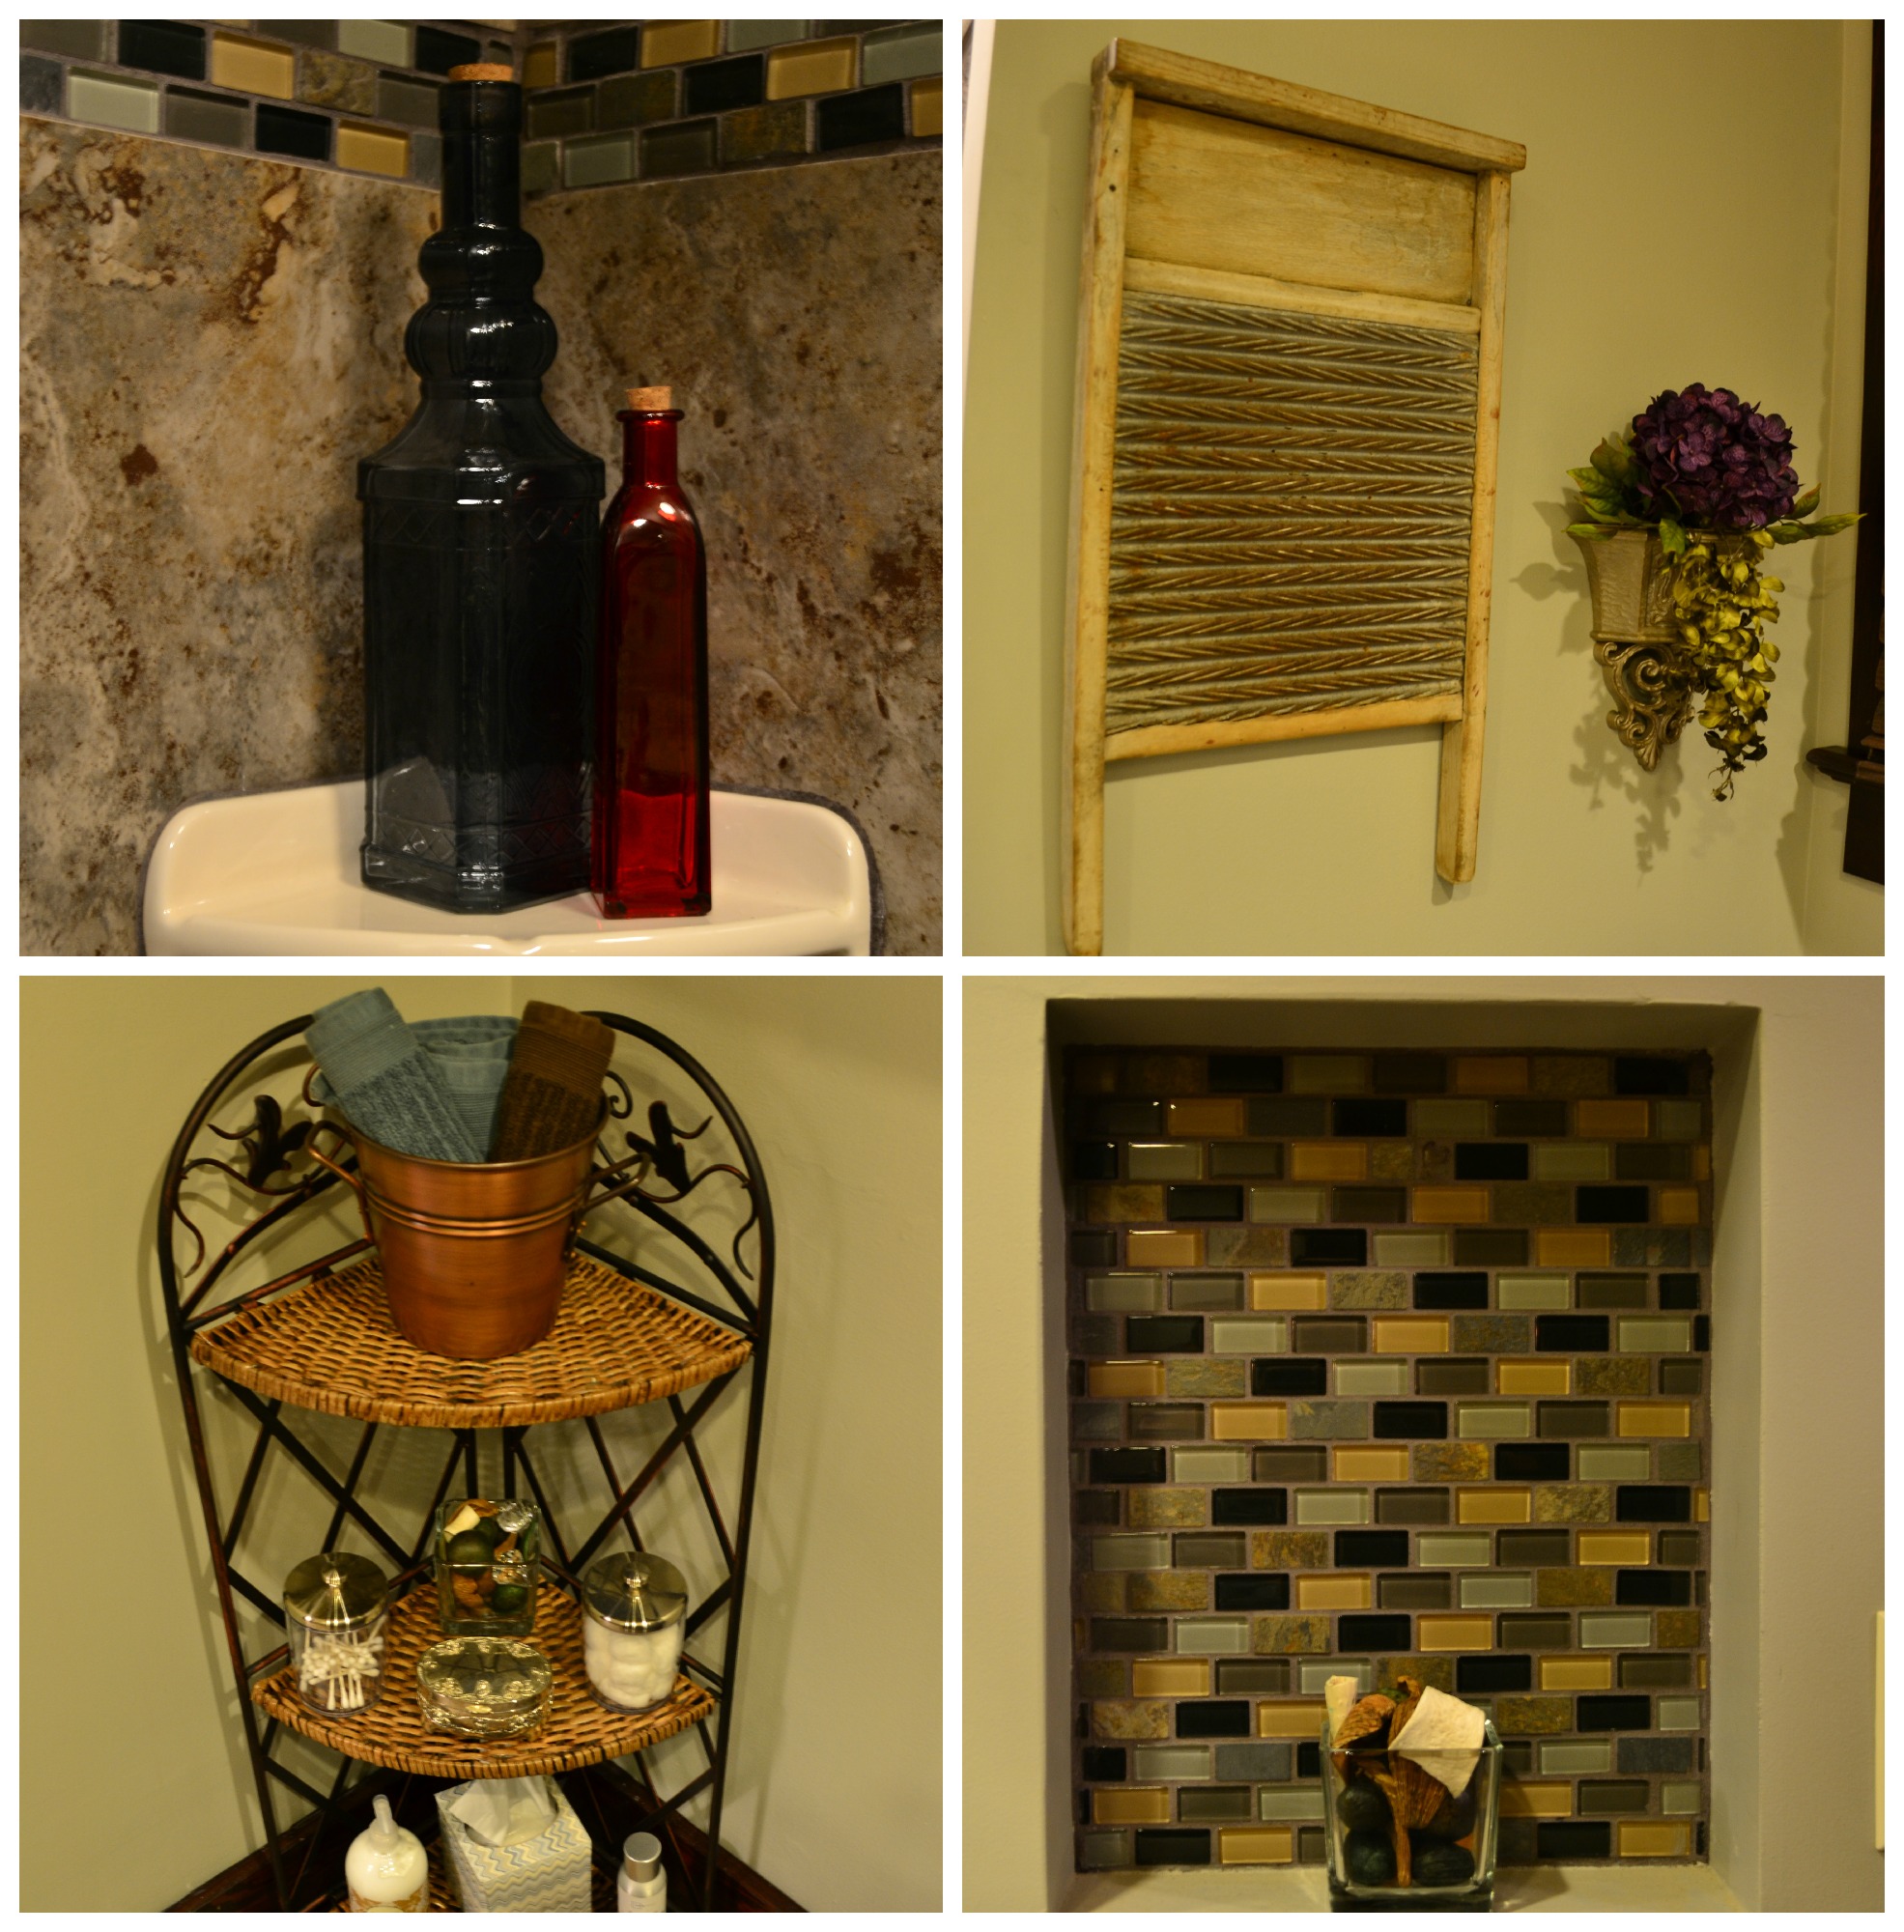
We also decided to fill in the area where the medicine cabinet used to be with the same mosaics that we used as an accent in the shower. Now we have a pretty cool little niche in the bathroom.

I think it would make a perfect home for a beta fish, don’t you? Entertainment while you sit on the loo! 😉

We got two mirrors with vintage stylings to hang over the double sinks and added a temporary mini blind for privacy until I can decide on curtains (hey! that’s a really big decision!)

We also decided to refrain from installing shower doors for right now. We got a cool shower curtain from Target that will work fine for the next couple of months though I definitely want to add clear shower doors eventually.  All that’s left to do in the bathoom is add the molding and find some cool shelves for between the mirrors.

I love our new bathroom!

Bathroom Remodel Part 1

Although this house was technically “liveable” when we purchased it, the bathroom was one thing that I wanted to change before we moved in. And when I say change I mean completely overhaul! That room was Nasty with a capital “N”!

I made plans to remove and replace the toilet, remove the tub surround, install ceramic in shower area and add a new bathtub, paint the oak cabinetry, replace bathroom light and shower fan, add a contractor’s mirror with custom molding and shelving to cover the wall above the double sinks, and finally, remove the medicine cabinet and repair that alcove.

As always, once the demolition got under way we discovered tons of other little things that were added to my list.  I also learned that no matter how “fun” and “dynamic” the word demolition may sound, it is a slowwwwww job that can take all day. Especially if your tub surround is superglued and screwed into the wall.

Removing the ceiling wasn’t too hard. It only meant destroying most of the drywall behind the toilet in order to get it out. :/ The best part was removing the three wall pieces that created the surround.  I  have an awesomely hilarious video of my dad trying to pull the pieces out but alas, I am too cheap to upgragde to PRO wordpress so you won’t get the privilege of seeing it 😉 I wanted to donate the tub surround to Habitat for Humanity so removing all the pieces intact was really important to me. That meant that the demolition took a bit longer than usual.

Once we got all the fiberglass surround removed, the bathroom looked like this.

Raul wanted to keep the wall this way and go for the renovated New-York-City-warehouse-as-a-living-space vibe. Yeahhh..not so much.

The next part included removing the tub. And that’s when we realized just how un-square this bathroom was built. I say “built” because even settling issues can’t account for what we were dealing with here. Folks, please, PLEASE do us all a favor and for heaven’s sake GET OUT YOUR FREAKIN’ LEVEL!!  We ended up having to move an entire wall over to get the required 60″ for the new bathtub.  And in case you’re unaware 60″ is the bathroom gold standard. Not 58″. And especially not 58″ inches at the bottom and 61″ at the top! lol

Anyways, once we spent what felt like days moving everything around just to get another 2 inches of space, we were finally able to install my lovely new biscuit-colored tub on special at Menard’s!  I actually had a new, white bathtub before that which I had planned to use. I had got it free but it turned out to be the wrong side and so we made a trip to the big box store. I LOVE my new tub though. It is much more spacious and the color goes much better than white would have. As a bonus it has nice flowing lines that, I think, add to the vintage feel of the house as opposed to the straight, rigid lines of the white tub which would have given off a much more modern vibe.

After the tub was in we lined the walls with cement board (which is heavy as HELL for those of you who might wonder) to prepare for the installation of the ceramic tile.

The next step was picking out tile for the shower. I actually found the tile at Lowe’s and then happened upon a cool mosaic strip at Homessss Depot to break up the color. Here’s a picture to give you an idea of what kind of look we’re going for.

Check back next time to see us suffer putting these bad boys up!

The Master Plan

So, what to do? Where to begin?

My goal is to complete all of the repairs and remodeling in the master bedroom and upstairs bathroom first. These are the two rooms that we absolutely have to update before I’m willing to spend the night…or shower at this house.

Take a look at what we’re working with.

Master BedroomMaster Bedroom

This room needs a ton of work.  The windows and flooring are original and beautiful but they have been neglected.  First things first, we must remove part of the flooring by the main window because it is buckling, probably due to some settling issues from the front porch and/or chimney.  I can’t decide if we will refinish these floors or cover with carpet.  We need to skim the ceiling with new drywall because it was damaged by water before and just looks…bumpy. Also, I am planning to open up a space under a staircase leading to the third story which will create a TV nook for us with exposed brick chimney. And, but of course, that closet space is getting an update! I plan to add a step-up to make a level differentiation for a dressing area as well as install custom closets and lighting. Oh, and paint. Can’t forget paint!

BathroomBathroom

The bathroom also needs a lot of work.  Both the tub/shower and the toilet are pretty skanky so they are getting replaced.  Lighting needs updated and new ceramic tile will be laid as well.  Paint will be updated and I will be putting in a new mirror and storage space above the counter.  I will probably keep the counter but update the vanity as the oak color really clashes with the rest of the woodwork in the house.  My dad thinks that there will probably some plumbing rerouting so hopefully we don’t get into anything too serious there.

Also, we plan to paint the downstairs minus the kitchen.  Right now this house is BRIGHT! Too bright for me. I mean, I love teal, in various shades, but not this much! With the help we are gonna have this weekend we hope to get a lot done! New pics coming soon!